The Martian Seasonal Calendar

marsflag

A Flag For Mars

With the colonization of Mars so recently making headlines, I’ve decided to spend my Leif Erikson Day making my own small contribution to exploration.

I had talked before about a human approach to timekeeping on the Red Planet, but my concepts for calendar keeping have been through a couple iterations over the years.

What makes my approach different is that it focuses on the thing that makes the Earth calendar most relevant – the seasons.

The Martian Seasonal Calendar

  • Epoch: The calendar begins Year 1 shortly after the austral winter solstice of 27 October 1955. Roughly similar to Mars Year 1 in Planetary Science, shifted by one season.
  • Day of Week Collision: The Mars 2 probe crash of Saturday, 21 Nov 1971 / MSD 38404.  Future MSD % 0 = Saturday.
  • Autumnal equinox year of 668.5940 days
  • Month length about 30 days. Seasons are divided into a whole number of months.

Nomenclature

  • The days of the week are not renamed just for Mars.
  • Whether “day” or “sol” is preferred for someone living on Mars is left to future consideration.
  • The names of the months should be representative of cultural perspectives on the planet Mars from various cultures.  I can make suggestions, but really, an IAU process should develop a final list.

Structure

  • Austral Winter months – 178 days
    • 6 Months of 31, 29, 29, 29, 29, 31 days
  • Austral Spring months – 142(143) days
    • 5 Months of 29, 28, 28(29), 28, 29 days
  • Austral Summer months – 154 days
    • 5 Months of 32, 30, 30, 30, 32 days
  • Austral Autumn months – 194 days
    • 6 Months of 33, 32, 32, 32, 32, 33 days

Seasons have months of equal length “bookended” by slightly longer months.

Solstices and Equinoxes precede the start of a month by 2-3 days.  Radiative Forcing will keep the start of the 12th month about the maximum temperature for the Southern Hemisphere.

Leap Days occur in the 9th Month, halfway between the autumnal equinox and southern solstice, relatively close to perihelion.  Even if another point in the year is chosen for the basis of the tropical year, this is probably the best spot to place the leap day.

Intercalation

Odd-numbered years have 669 days and Even-numbered years 668. Years ending in 0 shall also have a leap day, but 6 decadal years of each millennium (170, 330, 500, 670, 830, and 1000) are not leap years.  Average year: 668.594 days.

Some background thoughts

The Autumnal equinox year is a 180 from the Vernal equinox year.  On the surface, it upends millennia of timekeeping convention, but it’s worth noting that Earth culture has been dominated by Northern Hemisphere sensibilities due in part to the much greater landmass above the equator.

When Mars still had its oceans, they occupied the Northern Hemisphere. The Autumnal equinox is also closer to perihelion, and the peak of the Martian dust storm season, the major weather event of the year.


Toward a Key West Dial Guide

cubanstation

Green: Reception. Blue: Reception with severe interference Purple: Negative reception but should have picked it up Grey: May be have been US station same channel Yellow or Black: negative pickup (black too weak)

the-blimp-is-out-there

I’ll have a Venti Propaganda.

I had the chance to visit the Florida Keys recently, and you can guess what I was up to – hitting the beach to avoid AM interference from local electronics, so I could listen to Cuban radio stations!

I did a dial scan for both AM and FM sides, each with its own issues.

The math for daytime AM is pretty straightforward, it’s all groundwave so you can model power divided by distance squared.  A rich vein of data is the FCC AM Query page.  I pulled every AM signal within 450km of Key West and start whittling down against my notes.  The main difficulty in going up against the FCC records is that…  the FCC records are notoriously bad for international listings.  They get Canada wrong on a regular basis (at least two times in recent memory, they completely dropped the ball watching out for Industry Canada assignments that impacted NPR signals in North Dakota), and Cuba is another story entirely.  I’m pretty sure Cuba gives about zero flips for frequency coordinating with the US when we’ve still got blimp blasters in the Keys.

Some other radio fans managed to snag some data off of EcuRed and turn it into a semi-manageable transmitter site list, which I can also crossreference after updating the list with some distance data.

Another handicap is that I don’t speak Spanish, so I couldn’t glean much about those programs (though advertising seems exclusively American).  The easy part is I don’t have to worry about skywave from Mexico or the Dominican Republic, or wherever.  Since I couldn’t wait around to confirm callsigns, I’ll be poking around trying to confirm certain US stations in my model had Spanish programming around 1pm on the 25th.  Once I have accounted for all the Florida-based Spanish-language stations, the remainder must be Cuban!

My radio rig is a 1994-era car stereo that’s in my Geo Metro, I’m not hauling any fancy Grundig or what have you.  One thing about this radio is that, especially on AM, it tends to bleed on either side of a strong signal, so when I was taking my notes I ignored a lot of nearby stations that sounded the same.  Yet, if what I’m reading now about the Cuban radio networks is right, there might have been more separate stations than I thought.

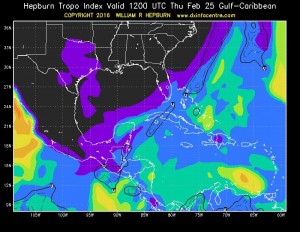
25feb-hepburnThe FM scan is more problematic.  Applying the same method as the AM scan, oddly, is not as sound of a model.  VHF signals are much more line-of-sight than AM, true, but at longer distances, especially over warm water, they are also subject to anomalous propagation through the atmosphere.  Tropospheric Propagation has a big fanbase in the ham radio community, it’s the main way uber-nerds snag a TV signal from 300 miles away.

According to the Tropo reports for noon on the 25th, there may have been a weak opening between the Keys and Cuba, and perhaps a hint more in the direction of Miami and the Bahamas.

Trying to sort out all the stations that might contribute to the FM dial readout will be tough, I’ll look at it more down the road.  Still, I’m pretty happy to have confirmed I caught at least two or three of the main Cuban radio networks.

Tangling with Secure Boot and UEFI in Ubuntu

Folks in Dallas, among other places, were wondering why in the world I would run Windows 8 as my primary system.  Well, I run ubuntu as much as I can, just off a stick. I have three USB sticks tied up as ubuntu LiveCDs for ages, hopping installs between them, attempting to find the secret sauce that will get me a fully-fledged, mutable, bootable system.

I’d certainly prefer to have an environment where audacity, kdenlive, vlc, inkscape, gimp, and my favourite fonts are already preinstalled. Old solutions like the Ubuntu Customization Kit used to do this easily, but were never well-supported, even back in the day when they still worked.

Why not just run ubuntu side-by-side with Windows?  Two issues.  I’m down all those USB sticks just now and I don’t really want to mess with my hard drive partitions whatsoever, without having a backup of my System Restore partition around.  I rather dislike the notion of a software problem ballooning into a $12-$50 how-much-backup-space can-you-buy issue.  This whole deal is supposed to be plug-and-chug!

It’s all tied into UEFI Secure Boot.  The LiveCD takes right away, no problems. As soon as I “install” onto a USB drive, though… it stops showing up in the boot menu.  I can get the install to work if I re-enable “Legacy” boot.  But that’s two runs to the BIOS during every reboot, super annoying.

So far the best I can do to work around is this: There’s a daily build of Ubuntu that in theory has all the latest security packages to start out with.  On the days I update my boot stick, I burn that to a secondary jump drive, and boot from it.  Then I take out my primary 16GB jump drive, and clone the new build to the primary stick with dd, onto the 1600MB of space I have reserved for Xenial at the moment.

All the  .deb files for my programs have been ferreted away on a second partition on that jump drive (copied over from /var/cache/apt following the usual sudo apt-get dance), since I’m not scared to use dpkg -i -R .

The jump drive is also rounded out with 8GB of swap space, because ubuntu runs out of RAM in a hurry when you install packages on the LiveCD environment.  There’s also this other odd issue, where it will halt, seemingly for no reason, even with all that swap, so maybe I’m barking up the wrong tree with that.

What I might do next is make a custom Debian disc, since that’s actually a half-decently supported toolchain, versus ubuntu where you’re just rolling the dice.  Now, keeping that updated is bound to be a real chore…

Part 2 of Let’s Encrypt will be delayed.

Barring some unexpected cooperation from my hosting provider, my HTTPS rollout will be delayed.  They have not rolled a management console for SSL certificates, and it’s not even on their radar for the basic hosting package.

My options going forward are to pay $20 a month for VPS with my current host or bolt, probably for Amazon Web Services, I’ll bet I can get under $20 easy.  Since everything is going to break either way, I’m leaning toward the latter.  If any webdev types have some other thoughts on good WordPress hosting companies that support SSL and multiple domains, I’m all ears.

Let’s Encrypt covers just one piece of the puzzle — getting a universally-recognized certificate.  Unfortunately, it can’t cover for everything else, especially if you have a web server stuck in 2008.

Getting started with Let’s Encrypt (without sudo)

What do you do if you want a Let’s Encrypt free certificate, but don’t have root access to your server?

One pitfall I found through searching too fast:  Don’t go out and use the old diafygi script on GitHub, its features are already in the latest Let’s Encrypt code.

If your webhost has Python, you might even be able to run Let’s Encrypt right on the server.  Mine isn’t set up right, though, so a fresh copy of an ubuntu LiveCD or USB Stick will do to begin. Once you’ve got your LiveCD system up and running, download Let’s Encrypt and extract it where convenient, your choice of:

git clone https://github.com/letsencrypt/letsencrypt

or

wget https://github.com/letsencrypt/letsencrypt/archive/master.zip
unzip master

You will need to enable Universe software to install Let’s Encrypt.  In ubuntu 15.10, the Universe repository is not enabled by default.  the easy way is to select the “Software & Updates” module from the ubuntu menu to select the Universe repository.

Once that hurdle is cleared, fire up Let’s Encrypt in manual mode.

./letsencrypt-auto certonly -a manual -d mydomain.com

After installing support software, LE automatically does everything in the background to get a secure certificate set up for a request to the LE servers. At this point, you’ll be instructed to post public URLs on your site for verification.

These challenges are composed of two parts, separated by a period. The specific domain is tied to the first part, and the second part is the same for each domain. The filename the LE servers are looking for is just the first part, and inside the file all the server wants to see is the whole-two part challenge.

Go to the top-level folder for your particular domain name(s) and run

mkdir .wellknown/acme-challenge
cd .wellknown/acme-challenge
nano (or your favourite text editor) [challengeheader]
[paste or enter entire challenge response line]

The challenge for the certificate must remain there until you have your certificate in hand, so don’t delete any challenges prematurely. You’ll need to repeat this in various combinations if your site has multiple folders and/or multiple domains.

If you have more than one domain/subdomain you are registering with the same certificate, you must have all of the files present before hitting ENTER the last time, which is when LE actually contacts your site to look for the challenge requests. So don’t tap through too fast.

When successful, you will get a set of files that together allow for SSL to your website. Configuring that is another story (I’ll let you know when I’m done!)

Fun with Papercraft

papercraftmmI need something semi-professional to strap to my microphone to look like a real journalist. Why not papercraft it?

This specific design uses a 80mm pattern, just barely fitting into the margins on a US Letter Size sheet.
I really wanted something rectangular, but in principle you could make a square or any other shaped design in Inkscape in a reasonable amount of time.  Word on the street is there’s STL-to-Papercraft software too, if you prefer pulp to plastic for everything.

papercraftdsWhile I was building it, I fed the geometry into DesignSpark just to check on things.
It turns out that my first design, with tabs running all along the top side, probably wouldn’t have worked with my microphone’s shape.  Chalk it up to measure twice, cut once!

Now, just pop some graphics on there and print it out!  Decent cardstock, a colour printer and exacto knife should do the trick. Or I could laser it, I suppose, though lining things up will be tricky.

Here’s some PDFs if you want to fly with my base design.  I’d recommend a rubber band and glue to hold it all together: papercraft_files.zip


Pisolating my USB ports

Have you ever fried a USB port hooking up your homebuilt 3D printer?  It was all the rage back in the day. Admittedly, this is not a major issue with newer RepRap and similar printers.  RAMPS and derived controller boards have moved away from self-supplying the 5V rail, or allowing the USB to connect directly to the board power, etc.  Even my own board has a diode link I could sever to clear the whole thing up, but for various reasons, I don’t want to do that.

So I built this instead:

fuseusb

The 500mA fuses protect each line from overcurrent, but the problem with the fused USB cable, is that while it prevents imminent damage to the USB line, it can’t guarantee reliable communications between the control computer and the Arduino Mega board.  You need a steady link to print anything.

So, going back to the drawing board, there are these expensive units called USB isolators, that cost $30 and up.  But you know what else you can get for about $30?  A Raspberry Pi nanocomputer.

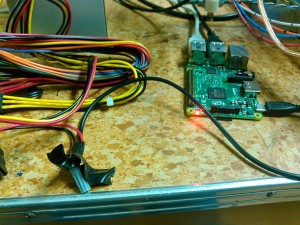
twisttogetherYou can sidestep almost all potential ground loop or voltage level issues just by tapping off the same PSU to power your Pi.  Take a couple wirenuts to a 5V rail and twist them onto a USB Micro-B cable to make a power feed.

To make this truly useful, you can’t use the older RPis — the original model B runs Pronterface glacially and balks at loading in GCode files of any size.  Your limit of one or two USB ports will also undo your ambitions if you want to set up a fully-functional workstation.  The four ports that come with the Pi2 and B+ set you well ahead, though the B+ lags by comparison.  Why not go with the do-it-all Pi2 for $10 more, anyway?

Another suggestion I’ve had is to use Octoprint, that way master control is back on a full-powered PC elsewhere;  for that a traditional Pi B would do just fine.

Running Xtightvnc vncserver automatically on Raspberry Pi

I spent, oh, literally a week figuring this one out.  Solid week bashing the old noggin against solid walls.  But the clouds of haze parted and left a shining path before me, how to get my VNC Server on my R-Pi working automagically on Raspbian Jessie.

Firstly, you should have raspi-config (or its GUI equivalent) set to autologin to the desktop.

Once you’ve installed the server, go ahead and edit LXDE’s autostart routine.

sudo apt-get install tightvncserver
vncpasswd
nano /home/pi/.config/lxsession/LXDE-pi/autostart

add this line at the bottom:

@nohup vncserver :1

If you get a checkered background, you have have to add an extra line at the bottom of your commands.  For example, I also launch pronterface automatically. Don’t forget the @!

Now, safety first, it’s highly recommended to connect to VNC through an SSH tunnel, or leave your Pi on its own network if you’re controlling it like this.  There is an option on the vncserver to only allow connections from localhost, if you care to change it down the line.

Now for logging into your new server, I recommend tightvnc, it’s available free on every platform.

Props to our Pi forebears!

First Goop!

The THI-9001 3D Printer has achieved first melt today!  With much thanks to Dan, Alex, and Patrick at TC Maker!

This is the first bit of PLA ever to melt in the Prusa.

This is the first bit of PLA ever to melt in the Prusa.

Curls of PLA stream from the print head.

Curls of PLA stream from the print head.


Pronterface-First-Goop

Pronterface on RPi2, via remote desktop

Making it on the road

Are North America’s Makerspaces the future of technology and manufacturing?  Starting September 22, stay tuned to j5mc.org for updates on a major project to organize, categorize, publicize the movement to share tools and technology among individual inventors, technicians, and artisans!

Along the way I hope to visit Fab Labs, Hackerspaces, and Maker groups of all stripes. My tentative plan will leave my old base of Grand Forks, via the Twin Cities, Detroit, the Canadian Core, and New York City. If there’s support by the time I make it to the Research Triangle, I might make it farther around the continent — Fingers crossed!

Aside from the blog, there will be much multimedia generated along the way, and I do plan to write a book as well.  If you have a question, resource, suggestion, etc — post a comment!